After I got a HP Deskjet 842C ink jet printer, and found out about the hidden high cost of ink supplies for it, I was naturally tempted to try to reverse-engineer the cartridges, to find out whether the electronic ID which distinguishes the otherwise identical expensive ripoff #15 cartridge and regular #45 cartridge (black ink) could somehow be bypassed without disabling ink jets.
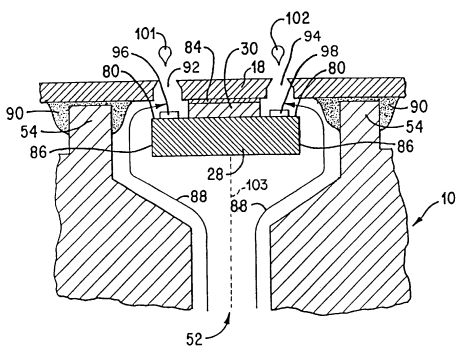
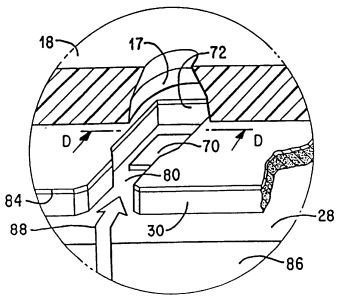
What I learned is that these cartridges are pretty fascinating technology. I had already taken one apart and studied it visually, taking pictures in the process, when I found US Patent 6,332,677 (the link links directly to the USPTO, at least until they change their URL scheme). This patent is as thorough a writeup of how these cartridges work as one could ask for. It has 26 pages of drawings and makes good reading, despite the legalese. The diagrams used here are taken from it. I assume this is OK, patent documents being public material.
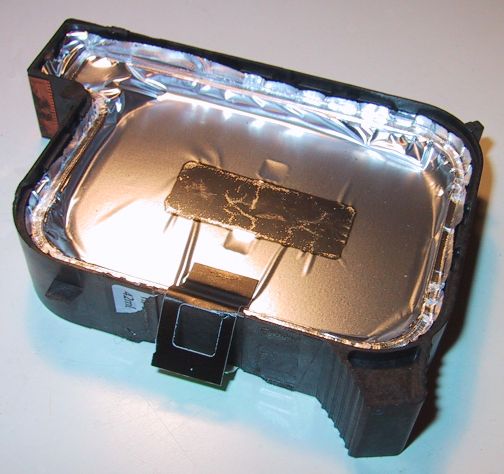
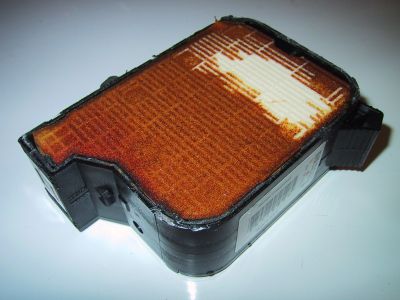
The following pictures show the disassembly of a #45 black cartridge. Despite being empty, as far as the printer was concerned, it still had lots of ink in it. I dealt with this by performing all disassembly under running tap water in the laundry tub. This way my hands did not get stained.
After removing the metal side covers, this is what you see:
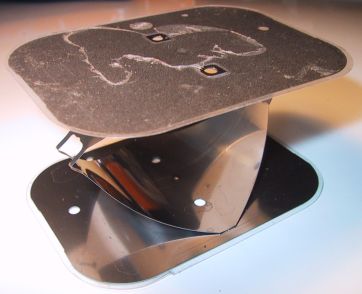
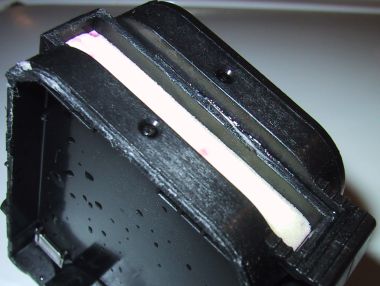
The ink compartment's side walls are a tough plastic foil, and get sucked inward as the ink is used up. There is never any air in the ink compartment. As you can see, the green ink level indicator is just two overlapping pieces of cardboard, one with a window in it, the other with a green bar, which get pulled apart as the foil moves inward.
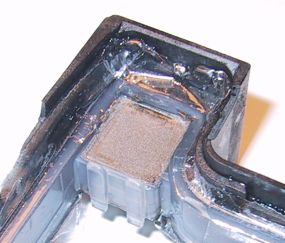
As soon as the ink compartment is punctured, the foil sides pop apart as air is sucked in. The reason is this spring arrangement inside:
Compressing this between your fingers, you feel a surprising amount of force. Why is it necessary? You would think with so much force pushing the sides of the ink pouch apart, the ink would get sucked in, not spray out. As it happens, ink jet printheads need a certain amount of vacuum to work properly, otherwise they dribble. The absence of this vacuum causes improperly refilled ink cartridges to make such a mess.
The vacuum is not very strong, when you consider the area over which the spring force is applied. In fact, if you work it out, it is only a little more than what's needed to hold up a column of ink the height of the cartridge when it is standing upright in the printer. Because the ink pouch is compressed as it empties, the height of this column never changes, and so the pressure at the print head stays the same over the life of the cartridge.
Before reaching the print head, the ink has to pass through one of two very fine metal screens:
I am guessing these exist so that minor clumps in the ink can't clog up the extremely tiny ink nozzles.
Glued to the outside of the cartridge body is this flexible circuit:
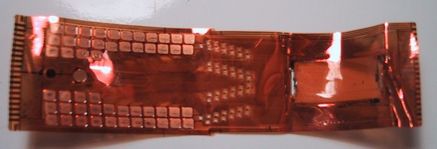
It interconnects the pads that mate with the printer's contact pins (left end) and the actual ink jets (right end). This circuit completely covers the bottom end of the cartridge, and thus has functions not just electrical but hydraulic as well - it forms part of the ink chamber, and it contains the 300 tiny holes through which the ink is squirted out.
The actual works are contained on this beautiful piece of silicon:

The short sides are where it connects to the flex circuit (you can see the holes torn into the flex when it was pulled off the chip). The long sides contain the ink jets.
Like the flex circuit, this chip does not just function electrically but hydraulically as well. Here is a crude microphotograph - taken with my point-and-shoot digital camera and a cheap plastic-lens microscope - of a small part of one of the long edges:
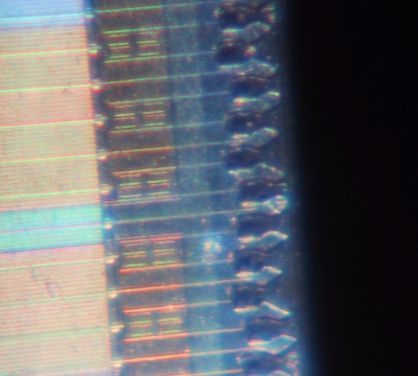
You can see that little "fiords" have been etched into the chip, through which the ink can flow in from the side (remember, the top is bonded to the flex circuit). Each ink jet chamber has a thin metal layer plated to the bottom of it, forming a resistor. When this resistor is suddenly heated with a large current, a layer of ink directly above it vaporizes, sending a shock wave upward. This shock wave causes a droplet of ink to be expelled through the hole in the flex circuit. The following two diagrams show this better:
This may seem simple, but enormous precision is required. For example, alternating rows of the 600dpi resolution are formed by ink jets on opposite sides of the chip. If the chip or the flex circuit was tilted by the tiniest fraction of a degree, the rows would not be evenly spaced. The holes themselves must be very accurately dimensioned and shaped to yield uniform sized droplets.
Overall, this is an impressive system. The entire printing mechanism consists of just a silicon chip and an interconnect flex, and yet it is able to lay down a 1/2 inch swath of printing at 600dpi in a single pass. The electronics are liquid-cooled - by the ink, in which the silicon chip is completely immersed.
The 300 ink jets are electrically connected as a 22x14 matrix (not all 308 positions are used). Up to 14 jets at a time are fired, in 22 phases. To get everything to line up vertically, given the staggered timing, the nozzles themselves are staggered physically. HP calls the 22 bank selects "address selects" and the other dimension "primitive selects". Each ink jet's circuitry consists of the driving transistor and the heater resistor, as shown:
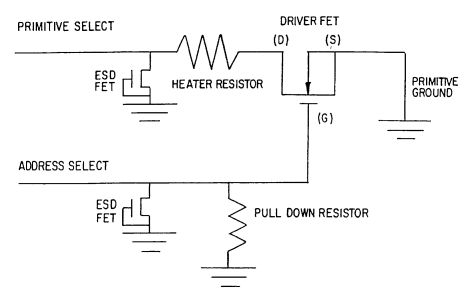
The 14 primitive selects, 14 primitive grounds, and 22 address selects form the bulk of the electrical connections to the cartridge.
When the cartridge is manufactured, after it has been filled with ink, the fill hole is plugged with a steel ball:
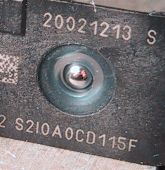
It is impossible to extract this ball without damaging the fill hole, so when cartridges are refilled, another plug is required. As you know now, this plug needs to be perfectly airtight, and the ink reservoir must have no air bubbles, for the ink pressure to be correct. I can imagine a refill procedure that would work: Drill a hole, fill the cartridge completely with ink (with a syringe), seal the hole up perfectly (with glue and a screw perhaps) and then suck a sufficient quantity of ink out of the cartridge to start compressing the spring inside. You would only need to set the cartridge on a paper towel to do this.
Oh, and how does the printer tell a #15 cartridge from a #45? I couldn't find any documentation on that (big surprise). But US Patent 6,325,483 describes an improvement to a cartridge ID system that is likely the one employed. Basically, whenever one of the 22 banks of ink jets is selected, one of 22 ID bits is also selected, and returned through a single "sense" pin to the printer. The bad news is, without modifying the chip, or modifying the printer (for example, by wiring in a fake ID circuit) you cannot spoof it. As it happens, by masking certain address lines, you can modify the ID enough to make a HP 842 ripoff printer accept the #45 cartridge. But then you lose 14 of 300 ink jets.
[Note: This guy has figured it out in greater detail!]
The ink pressure regulation is simpler: Instead of the spring-loaded pouch, the ink chambers simply contain a block of foam. Due to capillary action, the pressure of ink at the bottom is always the same regardless how much ink is still in the foam. If we pop the sides off a colour cartridge, we can see the outer blocks of foam:
To get to the middle one, we need to remove the top center piece of plastic:
These cartridges are much simpler to refill than the black ink ones. One must merely remove the rubber fill plugs at the top, re-soak the foam with a syringe until it is saturated, and put the plugs back in. The cartridge will even work with the plugs left out.
Update: March 28 2003
Norm Lyon posted some macro closeups of a colour print head on his page.