My MP3 Jukebox System
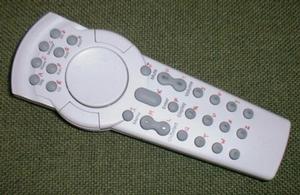
In December 1999, at a computer flea market, I found a neat looking remote control
along with a small receiver pod that looked like it would plug into
a 9-pin serial port and a Windows driver disk. Immediately I realized
that this was the key to getting a computer feed MP3 music to my stereo
without having ugly and nerdy looking PC display and input devices in
the living room.
At the same flea market, I therefore acquired a Pentium 75 motherboard,
8 megabytes of RAM to plug into it, a 240MB hard disk, a Soundblaster 16
sound card and an old ethernet card. In total I spent just under $100.
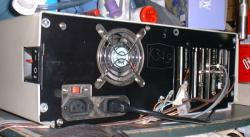
At home, I took the guts out of an old desktop 386SX machine and installed
the computer components. After I got Linux on there and some MP3s loaded,
I had a setback: The Pentium 75 was not fast enough to decode them in
real time. Fortunately moving a jumper to overclock the CPU to 90MHz
fixed the problem.
 The remote control was another story. The driver disk just hung a
Windows 95 setup, apparently it dated back to Windows 3.1 or something.
I had expected the remote control receiver to send bytes into the serial
port which I could decode by trial and error but it didn't do that, and
when I looked at the connector closely I found that the RxD pin wasn't
even connected.
It didn't occur to me to research on the net or I would have found
this page.
Instead I resurrected the remote control receiver code that I implemented
a long time ago on an 8031 microcontroller. Fortunately there are only
a handful of remote control protocols out there and my old code worked
with this remote control.
 First I built a temporary remote control receiver gadget to go between
the IR receiver pod and the computer's serial port. Later, after a friend
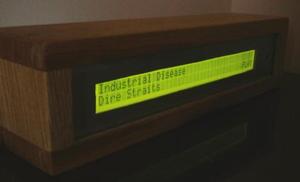
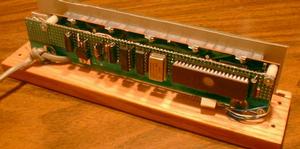
gave me a nice 40x2 character backlit LCD, I built a remote pod containing
an IR receiver, the display, and a microcontroller. My dad made the nice
oak and glass box for it. The pod connects to the computer using just
five signals: +12V, -12V, ground, serial TxD and RxD. When it detects
a remote control code it extracts the 16 bits of information and sends them
in hex followed by a carriage return. Any characters received are put on
the LCD, with only a simple hack to toggle the command/data control to
the display to control cursor positioning and such. The on/off control for
the backlight is very crude: It is just connected to the high bit of the
LCD data bus. So to turn the light off, I send a cursor home command
(0x80) with nothing following.
Since so many remote controls (for example the ones for a Kenwood stereo
receiver and Toshiba VCR that I have) use this same protocol, the microcontroller
in the box won't have to be reprogrammed if I destroy my present remote control;
all I have to do is buy a universal remote control, program it to one of the
brands that emit this type of code, and change my software to expect the
new 16-bit key codes (the codes in general seem to consist of an 8-bit vendor
portion and an 8-bit button portion.)
 To play the songs, I use an elaborate C program running on the Linux box
that spawns the command line player mpg123 as necessary. I wrote the software
over the Christmas break. I had to do quite a bit of tweaking to the Linux
hdparm parameters, the mpg123 output buffering and the kernel sound driver
buffering to get songs to play without interruptions on the primitive computer.
Once it all worked perfectly, I went out and spent $250 on a nice new 20GB
hard disk. This is enough to hold my entire CD collection plus whatever
I care to add in the foreseeable future.
The old Pentium board won't even think of booting from a 20GB disk so I
just leave a boot floppy in the drive. The machine runs all the time,
in fact as I write this it has rebooted just once since I put the big
disk in, because of a power failure.
In 8MB of memory, there is enough left over to run an NFS server so I can
access the MP3s from my main machine too, plus use the unused space on
the big disk for backups.
To encode all the CDs into MP3 format I used grip.
This turns a CD into a set of tagged MP3 files in about four mouse clicks.
Unfortunately on my Celeron 300A machine it still takes two hours to
do the job. I'm fairly fussy about quality, so I appreciate that it uses
the slow but reliable cdparanoia ripper, and I've set the encoding to use
BladeEnc at 160 kbps.
 The server machine now sits on a shelf in the basement, connected to the
display pod upstairs via a long cable. Line-level audio is fed to the
stereo receiver via shielded wires, and speaker-level audio to the speakers
via a pair of heavy gauge speaker cables. A couple of relays at the stereo
receiver switch the speakers to the receiver when it is on, and directly to
the jukebox when it is off. A surprising amount of volume can be gotten from
the Soundblaster card driving the big 3-way speakers directly. I cut the
ground prong off the machine's power cable and grounded it to the stereo
setup through the speaker
cables so there is no hum pickup when using the line-level connection.
Via the remote control, I can traverse the music collection by album
(vertical arrow controls), song on an album (horizontal arrows) or direct
search for a song name (this is what the letters written next to the buttons
are for.) There is volume control, mute and pause, and a button to jump
to a random song in the entire collection. I also have code for favourite
track lists but I got bored before I wrote the code to save them on disk
so they are lost whenever the server program is restarted. The same user
interface that is accessable through the remote control and LCD is also
accessable by telnetting to the server at port 6789, so I can actually
make my stereo at home play a song from my desk at work.
And if that's not enough, when it is not otherwise busy the jukebox system
emulates a cuckoo clock, striking on the hour between 7AM and 10PM inclusive.
I implemented that part using a couple of audio files that I found on the net,
to console myself after an evil thrift store shopper sniped me on a great deal
on a cuckoo clock that I had fallen in love with and was about to buy.
This is just the start. Having a live Linux machine in the house that
receives infrared remote control signals, can flash things on a display in
the living room, and has a fulltime connection to the internet, opens up
all kinds of hacking possibilities. For example it could say (in my own
voice) "You have mail" when a new message shows up on my POP3 mail account.
It can already say a bunch of stuff in my voice, for example speak the
current time, because I used voice prompts before I got the LCD.
Update: January 3, 2001
The system has now been online for a year. It no longer runs on a dedicated
machine, instead it resides on a Pentium 133 box that also serves as my internet
gateway, personal web server, DHCP server, CVS repository, NFS file server and
so on. A Pentium 133 on a good motherboard is still quite a capable machine as
a Linux server. For example with 100 megabit ethernet to my main machine,
I get 4 megabytes/second read/write speed on my NFS file systems.
A while ago I got a radio tuner card. By itself, a radio tuner card is a pretty
ridiculous idea -- an ordinary radio, with an antenna input and speaker output,
that doesn't even connect to a sound card. All it lets you do is control it
using an onscreen user interface rather than physical buttons and dials.
But for me it is perfect. Using the Linux device driver it appears as /dev/radio
and very simple I/O operations can be used to tune it and adjust the volume.
So over the past Christmas break, I added radio support to the jukebox software.
Not only can I listen to the radio via the remote control, but I can push a
button to start recording at any time. As well, there is a timer driven
record function so I can automatically record a favourite radio show every
Saturday morning. Recordings are 16 bit at 22050Hz.
Due to CPU limitations, I cannot directly encode them to MP3. Instead I store
them on the hard disk, and a low-priority background script converts them to MP3
later. I've switched to the lame encoder for all my encoding -- at 128kbps
it seems to do as good a job (to my ears) as BladeEnc at 160kbps, and for the
radio recordings I use a VBR mode that averages to 50-60kbps. The recordings
can be played back before, during and after the encode process; it is invisible
except for the drop in sound quality once the background process deletes the
uncompressed file.
My normal stereo system is now redunant and I've mothballed it. All that's
left in the living room is the jukebox head unit and the speakers.
Do you want to try out the software? I don't know how portable it is, but it
compiles and runs fine on Redhat 6.2 and Redhat 7.0. Download it.
Compile the main program by typing make . Ensure
the audio devices /dev/dsp and /dev/mixer
are accessable. Run the software by
typing ./jukebox . It will display a few messages (don't worry about
them, as long as it stays running). Now go to another shell window and type
telnet localhost 6789 . Once connected, type ^]mode char and press return
(where ^] means control and "]") then type ^L (i.e. control-L) to refresh the
display. You should see this:
+------------------------------------------+
| Tunnel of love                           |
| Dire Straits                        PLAY |
+------------------------------------------+

CR    = Play/Pause      BS   = Stop/Play Mode
Right = Next Track      Left = Previous Track
Down  = Next Album      Up   = Previous Album
[]    = Volume          M    = Mute
+-    = Next/Prev Fave  F    = Toggle Fave
A     = Album/Artist    /    = Find Track
<     = History Back    >    = History Forward
P     = Profile Select  N    = Random Track

0-9   = Go to 0%, 10%, 20%, ... (if possible)

T     = Talking Clock   C    = Cuckoo Mode
R     = Radio Mode      *    = Radio Recordings

^L    = Refresh display (all modes)
|
By using the cursor control keys you can navigate through the two sample albums
that are in the file musiclist . Unless you happen to have the music on your
disk with the exact path and file names, you won't be able to play it of course.
So let's talk about this file next. It has this format:
:Album Title|Artist
/path/to/song.mp3|-1|Song Title|Song Artist
...
:Next Album Title|Artist
...
The vertical bars are the field separators. The Artist field is optional.
The field shown as -1 can be replaced with the number of MP3 blocks in the
file to enable the random access mode i.e. the 0-9 keys. The program mp3_check
among others will display the block count of an MP3 file.
Having set up the music list file you should be able to play music, assuming
mpg123 is installed and on the command search path.
Even without mpg123 or valid MP3 files installed, you can hear the time in my
nerdy voice by pressing "T" and configure the cuckoo clock by pressing "C".
Immediately after you hear the cuckoo strike you can adjust the cuckoo volume
(rather than the main volume) with the volume control keys.
The cuckoo sound samples are from a web site that sells cuckoo clocks. I can
not find that web site any more, but if the legal owners of the sound files should
see this and object to my usage of them, they should please contact me and I
will remove them from this site. Realistically I think nobody will care.
If you have a radio card, ensure that its device driver is loaded, /dev/radio
has appropriate permissions, and the radio card's audio output is connected
to "line in" of the sound card. The radio portions of the software will then
be enabled. The radio stations are in the file radio.presets and the timer
record configuration is in the file timer.settings . The sample timer entry
is:
sat 103.3 10:00 60
The first field is the week day (as three letters) or "daily" for every day.
The second is the tuner frequency, the third the record start time (in 24-hour
format) and the last is the number of minutes to record.
Recordings are raw headerless files with 22050 samples per second, 16-bit
stereo. They are stored in the current directory. They can be played as
is. You can run the script encodescript in the background to convert them
to MP3 files using spare CPU cycles. The encoder lame is required for this.
Supposing you wished to build a remote control/display pod like mine, here is the interface
protocol.
First of all the remote pod connects to ttyS0 at 9600bps.
Received remote control codes must generate 4 hex digits followed
by a carriage return when the button is pushed, and a period followed by a
carriage return when the button is released. The "button up" signal is implicit
when two successive "button down" signals are received, i.e. only one button can
be active at a time. If the remote pod sends several "button up" signals in a
row this means it has just been powered up; the jukebox responds by sending
the LCD initialization sequence. This allows the remote to be autoconfigured
when it is plugged in with the jukebox software already running.
The remote pod contains an ordinary 40x2 character LCD controlled by a
HD44780 chip
or equivalent. All 40x2 character LCDs I've ever seen fall into this category.
Characters sent to the remote pod are simply sent to the LCD in "data" mode.
If a null character (i.e. zero) is received, it is not sent to the LCD; instead
a flag is set and the next character is sent in "control" mode. This allows
cursor positioning and such. There is no flow control, because the 9600bps serial
link is not fast enough to overrun the LCD. However the jukebox software sends
a series of null characters after a "clear display" function to allow the LCD to
complete the operation.
The backlight enable circuit is simply connected to the high bit of the LCD data bus. This way
the LCD is normally lit, but can be darkened by sending a "cursor home" command
(i.e. 0x00, 0x80) with nothing following.
My remote pod uses an 87C51 microcontroller clocked at 11.0592MHz, and running
the program supplied as romcode.asm . If you can make use of this, it should
be simple to determine what pins of the microcontroller the display and IR receiver
should be connected to. I can't be bothered with a schematic; if you need one
you shouldn't try to build this anyway.
The codes emitted by my particular remote control are in the file buttons.h . If the jukebox receives an unrecognized remote control code it prints it on
the standard output, so the values for your particular remote control can be
easily determined. However, you do need a remote control that emits the
correct type of codes.
The software is not commented very much and not particularly well written, but
after the most recent rewrites I'm no longer completely ashamed of it and it's
fairly readable. A lot of
configuration stuff is coded as #define directives in the various files; some
of it may have to be modified for particular radio or sound cards.
That's it. If you find this interesting, download the software, hack around with
it, figure out the rest.
Back to my projects page
 The remote control was another story. The driver disk just hung a
Windows 95 setup, apparently it dated back to Windows 3.1 or something.
I had expected the remote control receiver to send bytes into the serial
port which I could decode by trial and error but it didn't do that, and
when I looked at the connector closely I found that the RxD pin wasn't
even connected.


